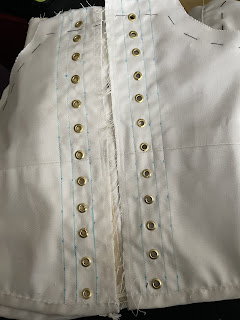
Hello again friends! Thought I’d drop by and let you know the progress of ye new regency medium stays.
At the end of our last episode, I was discussing the trials and tribulations of setting in gussets. I am delighted to announce (if I have not already - my memory is not good, y’all. Long Covid) that the back gussets (probably too many) are in, will be cross lacing (as previously described, due to lack of home assistance) rather than spiral. They look very neat and there were minimal issues with them.
I may have mentioned that I was sewing in boning channels - these are also now all complete, having used the excellent Korbond erasable fabric marker - I’ve been dabbing the stays with water this morning to remove said marked lines and they come off like MAGIC. I am VERY pleased with this item. Worth every penny.
I have also spent some time carefully stitching on binding to the bottom and top. Yes, this does mean I made a decision about straps and yes, they’re going to be entirely one inch cotton twill tape. I have hemmed one end of each strap, but I have yet to figure out how long they are going to be. The strap guards are set aside, ready to be stitched on after the final bones go into the boning channels and the last of the binding is sewn on.
I am expecting the final bones to arrive any day and I’m currently thinking about whether or not to machine stitch the top and bottom binding on, to a degree? The top binding has partial drawstring at the front, so I don’t want to catch that in any machine stitching (or it will have been a waste of time putting it in), but there no reason I can’t machine stitch the back and sides to the point where the drawstring (or ribbon) is attached to the stays themselves. Machine stitching will also give a nice finish. I do not expect to be able to machine stitch the back/sides binding down, due to its proximity to boning and no, I can’t stitch the boning down before the bones go in, lest I affect the boning channels. Yes, I possibly should have cut a couple more millimetres ease next to the back edge boning channels to accommodate this, but it’s me and we all know I’m not that sensible.
Another bit of work completed is the drafting and creation of the inner anti-gravity aids or “8o0by pads” if you will (intentional placement of numbers, that’s not a typo). They’re almost semicircle in shape, padded out and then hand quilted a little to help with stuffing distribution. I intend to place them inside the stands, at the bottom and towards the armsyces, using safety pins. I think they’re the right shape and I’m positive they’re the right size. This post is brought to you by the Joseph Joseph sieve of their nesting bowls and spoons thing, as it was the right size to draw round the edge of! Yikes! Previous experience of my first set of Mantua Maker and the wrap-around Daffodowndilly stays is that I absolutely do need something in there to prevent downwards slide and “pillows” are documented. If I lose weight, they’ll also be helpful in padding the cups out, hence why I want them to be easily positionable.
As I may have mentioned, the busk pocket is slightly loose, but it’s all now a question of waiting for these final bones, getting them in, sewing down binding properly and then a test fit before sorting the straps. At that point, I feel I can do a bit more busk pocket finagling if it’s sliding about in an uncomfortable fashion.
They are now so close to completion I feel I can thing about what to do next; as before, one of the petticoats has a lined bodice and it’s just too bulky under a dress. The rest of it is pretty good. I was chatting to a friend online and we thought about options.
1) I can take of the whole bodice, having first basted the pleats together. I can then add a waistband to the back, which I can leave open at the sides for the tapes on the front to go through, cross over and then tie (keeping it up). I can then use more twill tape (I have a lot) as straps, securing them to the back and front skirt waistbands.
2) I can take off one front layer of lining on each of the cross over flaps at the front and re-hem. I would be able to use the other layer on the new dress.
3) I can cut down the bodice at the front, to have nothing covering the bust and it fastening under the twins. If this sounds risqué, it’s not: the dress this is planned for will have an underlining and if I decide to use it for evening wear, I’ll just line the front bodice panels of any dresses.
Next project after this will be my new, front fastheing, drawstring regency dress and possibly fixing my useless chemisette, which is too wide for my narrow shoulders. I am reminded I have some pieces of fabric to wash and iron though, from the old projects. Oh joy.
As always, more photos are over on the album at The Costumeer Page on Facebook. You can also now support this, the furry overlords and my long Covid and disabled advocacy on ko-fi.com - you’ll find me at perfectlyimperfect7505.
Laters.


No comments:
Post a Comment